Saturday, 31 October 2009

What to do when your Windows is infected

Bookmark and Share

Removing a virus infection surely is a difficult job. Anti-virus software can be very helpful, removing most of viruses easily. But sometimes, your computer may get infected with a really annoying virus which will not be removed with ease. Well, is it a dead end?

Viruses always load themselves when windows starts. Adding themselves to windows registry start up keys, or register as the file handler for a certain file type so every time that file type is loaded the virus is loaded first. To solve this dilemma (Starting Windows system without invoking the virus), you have to boot your system from a Bootable Windows CD or DVD and use it to log on your infected system.

Now, you have started your windows system and the virus is dormant, so far so good. Running your anti-virus now is not the best option, I recommend using anti-virus from a USB Drive. Plug in the USB drive before booing, and make sure to disable "autorun" option just in case your the USB drive was infected with an autorun worm. Now, shut down the computer ,plug in the USB drive, and start up your computer. Note that the bootable CD will not recognize the USB drive if it was not plugged in before computer booting. Scan your system and get rid of the invader.

I will not recommend using system restore point to get your system back,because usually viruses infect it too.

Here you are the AutoStart Entry Points in Windows:
  1. WIN.INI file:

    it's a file belongs to old winows versions (3.x and 9x) to load applications and configuration settings at startup. The pertinent sections to check in the WIN.INI file are the and lines located under the [Windows] heading.

  2. System.ini File:

    The system.ini file was used in earlier versions of Windows to load device drivers and the explorer shell. It is no longer used by Windows XP and above. The pertinent line to check in the system.ini file is , located under the [boot] heading.

  3. Startup Folder:

    The Windows Startup folder of the current logged on user can view startup folder inclusions through the Start menu:
    Start | Programs | Startup .

    You can view items in the Startup folder by navigating to:

    %USERPROFILE%\Start Menu\Programs\Startup (where %USERPROFILE%) signals the username of the logged on user)

    The common startup folder, applicable to all users:

    %ALLUSERSPROFILE%\Start Menu\Programs\Startup

  4. System Registry Run Keys:

    Windows uses specific registry keys values to load applications (including malware) when starting up. The values to examine are located in subkeys Run, RunOnce, RunServices, and RunServicesOnce, located in either of the following registry keys:

    HKEY_CURRENT_USER\SOFTWARE\Microsoft\Windows\CurrentVersion\
    HKEY_LOCAL_MACHINE\SOFTWARE\Microsoft\Windows\CurrentVersion\

  5. ASEPS Specific to ME, 2000, XP:

    Users running Windows ME, 2000 or XP will also want to check the following registry keys for any unexpected values:

    HKCU\Software\Microsoft\Windows\CurrentVersion\Policies\Explorer\Run
    HKLM\Software\Microsoft\Windows\CurrentVersion\Policies\Explorer\Run

    HKCU = HKEY_CURRENT_USER
    HKLM = HKEY_LOCAL_MACHINE

  6. System Registry - Winlogon:
    Winlogon is responsible for supporting the DLL responsible for managing the interactive logon when Windows starts. Pre-Vista, that DLL provides a customizable user interface and authentication process. Malware that hooks into Winlogon can be particularly difficult to remove, as even booting into Safe Mode will not deactivate it. The string values that customize the Winlogon process are located in the following registry key:

    HKEY_LOCAL_MACHINE\SOFTWARE\Microsoft\
    Windows NT\CurrentVersion\Winlogon

  7. Active Setup:

    Any program specified by the StubPath value will be loaded when Windows is started. Pertinent key location is:
    HKLM\SOFTWARE\Microsoft\Active Setup\Installed Components\

  8. Upgrades from Windows 9x:

    Users who installed an upgrade version of ME, 2000, or XP over an installation of Windows 9x will also want to check the following registry locations:

    HKEY_CURRENT_USER\Software\Microsoft\Windows NT\CurrentVersion
    HKEY_LOCAL_MACHINE\Software\Microsoft\Windows NT\CurrentVersion

    These keys will contain items from the and lines of the win.ini file used by Windows 9x.
Loading Sequence:

Which key runs first when windows starts up:

  • RunServices / RunServicesOnce - HKEY_LOCAL_MACHINE and HKEY_CURRENT_USER RunServices/RunServicesOnce will be launched concurrently. In the event of a conflict, precedent is given to HKEY_LOCAL_MACHINE. These ASEPS may continue loading during and after the login dialog.

  • Login Dialog (Winlogon).

  • RunOnce / Run for HKEY_LOCAL_MACHINE hive.

  • Run key in HKEY_CURRENT_USER hive.

  • Startup Folder.

  • RunOnce in HKEY_CURRENT_USER hive


Kaspersky ®

Anti-Virus 2010 45 days money back warranty

This improved and easy-to-use solution provides complete antivirus protection that allows you to surf the web safely and keeps your PC free of viruses, Internet and email worms, and Trojans.

Only $39.95

Make your Internet Explorer safer

Bookmark and Share
Internet Explorer has a built-in mechanism for controlling threatens and spyware. The good news is it's free.

First of all, make sure that you have the latest version of IE and all necessary updates have been installed. To have the latest version visit Windows Update Center

To begin, ensure you have the latest version of Internet Explorer and that all necessary patches and updates have been applied. To obtain the latest version and required updates, visit the Windows Update Center.

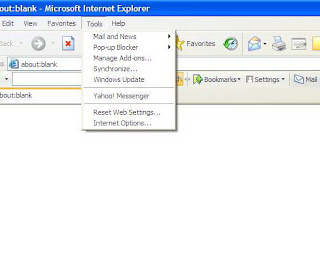
To access the Security Zones, open Internet Explorer, choose Tools from the menu, select Internet Options, and click the Security tab.


Security Zones
Internet Explorer provides four distinct security zones, each of them can be configured to provide custom protection for safer Internet browsing.

  • Internet zone - The Internet zone is the default zone for all sites not listed in other zones.

  • Local Intranet - Typically for local files or those coming from local networks.

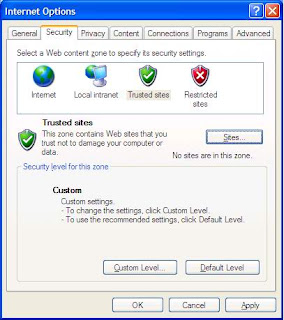
  • Trusted Sites zone - Use the Trusted Sites zone for sites you visit frequently which require downloading files, playing Flash animations, or active scripting .

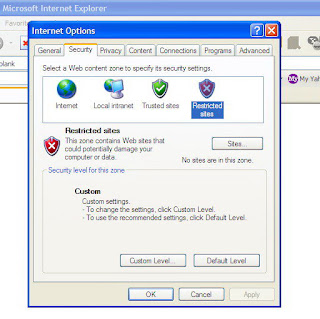
  • Restricted Sites zone - Use the Restricted Sites zone to suppress pop-up advertising, minimize the use of cookies, or otherwise restrict the actions allowed by listed sites.
Each of security zones (Internet, Local intranet, Trusted sites, and Restricted sites) can be configured to either a Custom Level or Default Level. All sites not listed elsewhere will default to the Internet Zone.

The Internet Zone :


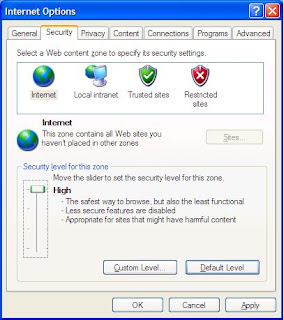
The simplest - but also the restrictive (and secure) - method is to change the Internet Zone to High. To access the Security Zones, open Internet Explorer, choose Tools from the menu, select Internet Options, and click the Security tab. Make sure Internet is highlighted, then click the Default button and move the slide bar it reflects High.


To Set to Default Level (Medium). Make sure Internet is highlighted, then click the Default button, slide the bar until it reflects Medium. This provides the best compromise between security and browsing comfort. Although , this setting will not stop pop-ups, it will stop active scripting and ActiveX controls that are deemed unsafe and/or are not signed.

After setting the security level to Medium, surf the internet as usual for few days and watch sites behavior .When you find sites that display annoying pop-ups or displaying unwanted active content, copy and paste the URL of these sites into the restricted sites zone. Also, when you find a trusted site that does not work as usual ,copy and paste the URL into your trusted sites zone.

The Trusted zone:

You can add sites you trust or usually visit to the Trusted zone. As I mentioned before, you can set the Trusted Sites zone to Medium or Low, according to your needs.

To add sites to the Trusted sites zone, highlight the desired zone, click the Sites button. In the dialog box, type in the desired site's URL and click Add. To remove a site from the list, simply highlight it in the list and choose Remove.


Restricted Sites Zone :

Highlight Restricted Sites and select the Default Level, make sure that the slide bar is set to High. Conversely, you can customize the settings by choosing Custom Level . For the maximum safety and suppression of pop-ups, all active scripting should be disabled for the Restricted Sites zone.

To add sites to this zone, highlight the desired zone, then click the Sites button. In the dialog box, type in the desired site's URL (or copy and paste it from the Notepad file you created) and click Add. To remove a site from the list, simply highlight it and choose Remove.

Bookmark and Share

Thursday, 29 October 2009

Protect yourself from Phishing Sites /Attacks


Bookmark and Share


What is Phishing?

Phishing is an e-mail fraud method in which the hacker sends out legitimate-looking email in an attempt to collect personal and financial information from you. Typically, the messages appear to come from well known Web sites. Web sites that are usually targeted by phishers include PayPal, eBay, MSN, Yahoo, Facebook, and America Online.

How To protect yourself from Phishing Attacks?

Well, there are two methods you can use to protect yourself from phishing:

The first one is: Netcraft Toolbar . Netcraft tool bar is a free toolbar Internet Explorer and Firefox. This tool will definitely help you a lot to catch phishing site. You will get this alert when visiting a Phishing site:

The Toolbar also:
  • Catch suspicious URLs containing characters which have no common purpose other than to deceive.
  • Enforces display of browser navigational controls (toolbar & address bar) in all windows, to defend against pop up windows which attempt to hide the navigational controls.
  • Clearly displays sites’ hosting location, including country, helping you to evaluate fraudulent urls (e.g. the real citibank.com or barclays.co.uk sites are unlikely to be hosted in the former Soviet Union).
http://toolbar.netcraft.com/help/tutorials/installing.html

The Second one (works only for IE 8):SmartScreen Filter.SmartScreen Filter is an option in Internet Explorer 8 that helps you avoid socially harmful phishing Web sites and online fraud browsing the Web.

SmartScreen Filter:
  • Checks Web sites against a dynamically updated list of reported phishing and sites.

  • Checks software downloads against a dynamically updated list of reported malicious software sites.

  • Helps prevent you from visiting phishing Web sites and other Web sites that contain malware that can lead to identity theft.
When you have the SmartScreen Filter turned on, if you attempt to visit a Web site that has been reported, the screen below appears and advises you not to continue to the unsafe Web site.


The SmartScreen Filter also warns you when you download unsafe software. The above warning screen will warn you that the download has been blocked for your safety.

In order to turn on SmartScreen Filter :
  • Click the Safety button. Point to SmartScreen Filter, and then click Turn On SmartScreen Filter.
  • In the SmartScreen Filter dialog box, click OK.
SmartScreen source: Microsoft Website


What to do if you came across a new phishing website?


Report it at once to the Anti-Phishing Working Group, the U.S. Federal Trade Commission (FTC) and the FBI through the Internet Fraud Complaint Center. They would shut down the sites and catch the responsible.


Other resources:

Phishing - Wikipedia, the free encyclopedia
Explains some common phishing methods and dangers.
http://en.wikipedia.org/wiki/Phishing

Anti-Phishing Working Group
Our mission is to provide a resource for information on the problem and solutions for phishing and email fraud.
http://www.antiphishing.org/

OnGuard Online - Phishing
Phishing section of an informational website run by the US Federal Trade Commission. Offers advice on how to spot, avoid and report phishing attacks.
http://onguardonline.gov/phishing.html

Recognize phishing scams and fraudulent e-mails
Phishing is a type of e-mail scam designed to steal your identity. Learn more about how this scam works and what a phishing e-mail message may look like.
http://www.microsoft.com/protect/yourself/phishing/identify.mspx

Bookmark and Share

Friday, 23 October 2009

Download free PHP proxy scripts

here you can find free PHP proxy scripts for you to download for free, and start your own proxy site.

PHPROXY SCRIPT

PHProxy is a Web HTTP proxy programmed in PHP. It has similarities to CGIProxy by Jim Marshall, however, doesn't generally permit logging in, which means myspace and other user based sites are out. Options available are: disable JavaScript, accept cookies, show images, etc.

Phproxy Demo

Download Phproxy

ZELUNE PROXY SCRIPT

Zelune is a proxy script that uses Curl instead of the usual PHP or CGI. It is the latest to come out and appears to be pretty quick!

Zelune Demo

Download Zelune

CGI PROXY SCRIPT

Cgi proxy is the most common proxy sofwtare available. It is literally available on thousands of proxy websites across the internet. It has the ability to allow logging into sites like myspace etc... It uses less bandwidth than PHProxy, but much more RAM!

CGI proxy Demo

Download CGI Proxy

GLYPE PROXY SCRIPT

Glype Proxy is a free web-based proxy script written in PHP. It allows webmasters to quickly and easily set up their own proxy site. Glype Proxy is intended to be a fast and reliable alternative to the widely used PHProxy and CGIProxy. Glype proxy has been coded with a strict emphasis on speed, performance and usability.

Glype proxy Demo

Download Glype Proxy

SURROGAFIER PROXY SCRIPT

Surrogafier is a PHP proxy script which is easy to install and provides a 3 tier web proxy. It's free to use and distribute! Features include the ability to remove cookies, the HTTP referer field, the HTTP user-agent field, scripts on the page, and objects, altering the user-agent string to whatever you please, and tunnelling your proxied traffic through a second proxy.

Download Surrogafier Proxy

Friday, 9 October 2009

Firefox proxy addson

Hello, Here you are very useful proxy ad-dons for Firefox. With these tools you don't have to use any web proxy to surf the internet. These ad-dons do exactly the same what web proxies do, hide your IP, pass work or school firewall. Of course you have to install them first to your Firefox.
Works with Firefox: 1.5 – 3.0.*
  • ProxySel 1.3.12b

    Import proxy lists in different formats, available from http://proxy-list.org/en/ or
    http://www.checkedproxylists.com/
    or import Proxys from any webpage directly.


    The Proxy selection and processing utility is a Mozilla extension that let you select a proxy from a drop down menu. You may import proxy lists in different formats, available from
    http://www.checkedproxylists.com/ or
    http://proxy-list.org/
    Download the list you want, save it on disk and import it into ProxySel.


    Works with Firefox: 2.0 – 3.1b2

    Homepage http://www.lssystems.at/

  • Tor-Proxy.NET Toolbar 0.3.2
    Get Safety and Anonymity by using TOR-Proxy.NET for surfing! Tor-Proxy.NET is a CGI-Web-Proxy, which tunnels your traffic through different anonymization-networks. That way you get high anonymity.

    Works with Firefox: 1.0 – 3.5.*

    Homepage http://tor-proxy.net

    Install it

  • Phzilla (formerly PhProxy - InBasic) 3.5.1B
    PhZilla acts as a protective screener between the user and the internet. The server downloads the page into its memory, and then displays it to the user. From the point-of-view (in the technical sense) of the host hosting the target site, only the server visited. This means only the server's IP will be logged, and not the user's (Ref: wikipedia)

    Usage: After installation, in Status-bar 'P Icon' appears.

    Install It

  • Gladder 2.0.4.1
    A proxy tool works on a customizable sites list!
    with it, you can:
    * visit wikipedia.org and its sister sites
    * visit google cached page
    * visit gmail and orkut more stably (with https connection)
    * with one click, add a site to a list then any page in the site will be opened with a web proxy

    Install it