Showing posts with label mirc. Show all posts

Friday, 10 July 2009

Configure mIRC For Use With Proxy Servers

Setting Up mIRC For The Proxy

Start up mIRC
Configure mIRC to use the proxy server by opening your the program.
(different versions of mIRC may vary depending on newer/older options and versions)
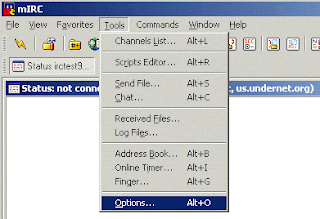
Click on Tools and select "Options" as shown below.


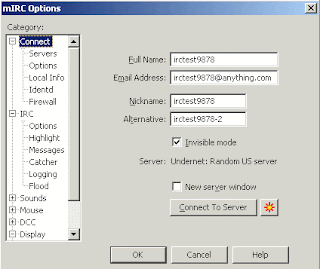
Click on Connect and then check your information.
With many IRC servers, the email name that you select in this window will control what user name that you are showing up as when users are using whois on you. In this case irc2009@server.com will display "
irc2009" as the login name on some IRC servers. Other servers will take the name from the IDENT configuration, while others may display your proxy user name that you selected when you signed up with our service. You may need to try different servers to get your desired result.


Click the Local Info option.
Place a check in Local Host and make sure that the radio button has the Server option selected as shown below. If you are having any problems you can come back to this window and change the settings, but if they do not fix your problem be sure to come back and change the settings back to those shown in this help section. Take out any local host or ip address information that may already be in those areas. This information should be filled in automatically when you connect. Old settings can cause problems.

NOTE: If you are trying different settings you may find that you need to close and then restart mIRC between your changes to get true results.

Click on the Firewall option

Select Firewall support [ Both ] for DCC file transfer
Select Protocol Socks5
Type in the proxy ip address in the Hostname area that you wrote down from the socks5 list in step # 2
.

Enter your proxy user name for our service
Enter your proxy password
Type in the proxy Port that you wrote down from the socks5 list in step # 2.


Now you are done. Click on the OK button until you are back to the main mIRC window and connect to a server.


Thursday, 2 July 2009

Configuring Your Computer to Access the Proxy Server

What is Proxy Server?

A proxy server is a machine that sits between the proxy users and the servers that they need access to. When a proxy user requests a certain remote resource using a URL, the proxy server receives this request and fetches the resource to fulfill the client’s request. This process enables the proxy server to store the requested content in a cache. Any new request that asks for information already in the cache no longer needs to be serviced by fetching it from the remote server. Instead, the new request is serviced from the cached data. In typical proxy scenarios, the purpose of a proxy server is to fetch the requested resource from the remote server, return it to the requesting user, and cache it in local drives.

What is an anonymous proxy server?

Anonymous proxy does not transfer the information about the IP-address of its user, and thus effectively hide the information about you and your surfing interests. In addition, some proxies (the so-called elite proxies) can also hide the fact that a user surfing through a proxy server. So there are two types of anonymous proxies (see below).

Anonymous Proxy server does not send HTTP_X_FORWARDED_FOR variable to host, this improves privacy since your IP address cannot be logged.

Elite proxy (high anonymity) does not send HTTP_X_FORWARDED_FOR, HTTP_VIA and HTTP_PROXY_CONNECTION variables. Host doesn't even know you are using proxy server and of course it doesn't know your IP address.

What is CoDeeN proxy?

PlanetLab (CoDeeN) proxy - The PlanetLab Consortium is a collection of academic, industrial, and government institutions cooperating to support and enhance the PlanetLab overlay network. CoDeeN is an academic testbed Content Distribution Network (CDN) built on top of PlanetLab by the Network Systems Group at Princeton University. This testbed CDN consists of a network of high-performance proxy servers. Currently, proxy servers have been deployed on many PlanetLab nodes. These proxy servers behave both as request redirectors and server surrogates. They cooperate with each other and collectively provide a fast and robust web content delivery service to CoDeeN users. Note that all accesses via CoDeeN are logged, mostly to aid in identifying abuse and other forms of damage control. However, these proxies are good for browsing some Internet resources.

Configuring Your Computer to Access the HTTP Proxy Server

Internet Explorer 6.0:

  1. On the Tools menu in Internet Explorer, click Internet Options, click the Connections tab, and then click LAN Settings.
  2. Under Proxy server, click to select the Use a proxy server for your LAN check box.
  3. In the Address box, type the IP address of the proxy server.
  4. In the Port box, type the port number that is used by the proxy server for client connections (by default, 8080).

  5. You can click to select the Bypass proxy server for local addresses check box if you do not want the proxy server computer to be used when you connect to a computer on the local network (this may speed up performance).
  6. Click OK to close the LAN Settings dialog box.
  7. Click OK again to close the Internet Options dialog box.

HTTP Proxy Settings For FireFox:
  1. Click on Tools and select "Options" as shown below


  2. Click on the General tab and then the Connection Settings button.


  3. Click the radio button for Manual proxy configuration.


  4. Type in the proxy IP address and port that you chose.


  5. Check the box for Use this proxy for all protocols.


    Now you are done. Click on the OK button until you are back to the main FireFox window.